
Quick Guide: How to Create a WordPress Blog?
With almost one-fourth of the websites across the globe powered by WordPress, it is undoubtedly one of the easiest and most popular platforms used for blogging across the globe. So, if you are interested in blogging and are looking to launch your own blog, then there are no two ways about it that WordPress is one of the best platforms.

However, if you are wondering how to install a WordPress Website, then be rest assured that you are not alone. There are many across the globe who intend to share a lot but are held back as they have no clue as on how to install WordPress and to use it.
The self-host part
The best way to go about it is “self-hosting”. Using WordPress for self-hosting can be pretty amazing and top multinational like CNN, NYTimes and thousand of other websites are doing it to reach audiences across the globe.
Here is a step by step guideline of how to set-up a WordPress blog
Step 1
Buy a web-hosting and get a domain name
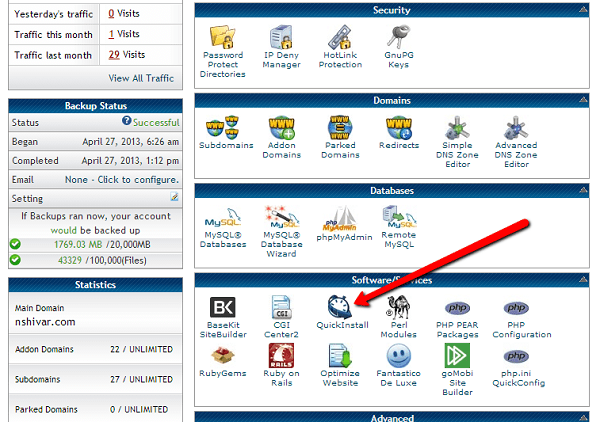
The best way to install WordPress is in your hosting account is by installing QuickInstall which is powered by Mojo MarketPlace. It makes the installation process smooth and within a few minutes, the WordPress blog is installed and is up for running.
There are various ways that Hostgator offer to get WordPress installed on the server. They are –
- Quick Install
- Manual
Get 20% off all New HostGator Hosting plans with Coupon: SNAPPY.
First and foremost you have to install the WordPress, org blog software. It is actually a blogger’s software, it is extremely flexible for all types of websites. You can easily download the current version from WordPress.org; but in most cases, we use web hosts to install or download it.
So, what exactly is Web Hosting?
WordPress is an open-source free software that must be installed on any server. Such a server is also known as web hosting, which means you need to put the WordPress onto to a server.
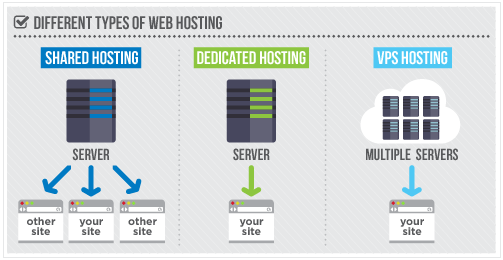
Unless, you have sources in Google, you have to pay for your domain or server space. Yes, though the WordPress server is free and you are always updated with the newer versions, you need the web space to host the WordPress site and it is this space on the web server that you pay for.
So, where do you get hosting?
These days, there are a number of web hosts available. Among the many web hosts that are available, HostGator is the smoothest and most user-friendly. From my own experience I would recommend HostGator for hosting server. The QuickInstall is phenomenal, the backend looks great and results are mostly user perfect.
Another big advantage is the prices they quote. The prices are affordable and the back-end support is one of the best. Hence, it is often recommended as one of the best web hosts for beginners.
A step by step procedure for a self-hosted WordPress.org Blog
- Register hosting – Once you are in HostGator, you need to click on Web hosting and according follow the links or process of hosting displayed on the page.
- Choose a domain name – A domain name should be unique, coined as per your choice and one that can be branded across the web. You can also choose from org or a .biz, .net, .co or something else that is available.
- Choose a Hosting Plan – You need to select a hatchling for twelve months along with an username and a Security Pin. The user id and security pin code is very important and will be required during the billing portal.
- Enter billing information – The process is very similar to the purchases you do over eBay, Amazon, and Netflix or other online shopping.
- Review Order details – Once the order is placed, it’s important to review and recheck the order for smooth delivery.
- Change nameservers – Go back to your mail id and open the mail with the subject “Thank You for choosing HostGator. Here you will need the login name and security pin which you will enter. Here you need to enter Nameservers and you are ready to go.”
Install WordPress
- Once you have entered nameservers, you need to clink the Control Panel link and start with WordPress.
- Clicking on the WordPress Link, you will enter the control panel link and enter your Username and Password.
- Next, click on the WordPress Installer
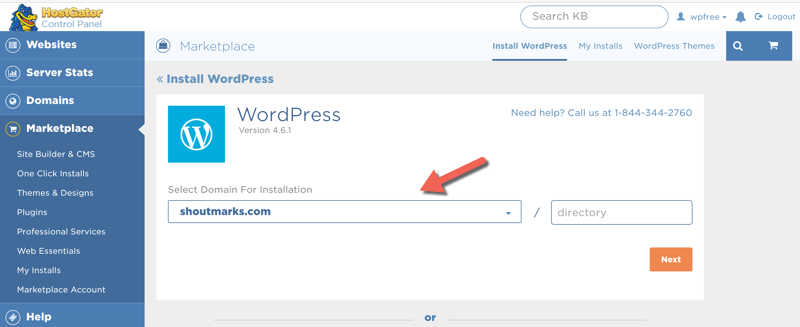
- Next, pick a domain name from the drop-down list.
- Next, you need to put down some basic blog info. All this is editable and can be changed later.
Once now click on the install button.
So what’s the cost?
The biggest reason that a lot of people use HostGator for it’s hosting is the low prices and great support, The setup of your blog starts with a blog host and ends with logging into your new WordPress.org blog.


- Top 10 Web Development Companies in Kolkata - October 10, 2025
- The Last Human Job? Reimagining Work in the Age of Automation - January 25, 2025
- Eye-Catching Thumbnails: A Powerful YouTube Channel Growth Tool - November 26, 2023
Related Posts


About The Author
Debarup
Hi friends, This is Debarup Mukherjee, a Digital Marketing Specialist, SEO Consultant & Blogger. I have over 12 years experience in Digital Marketing. I love to write on technology and SEO. I have built many blogs, one of them is Techno World News, specially for Technology & Internet. Hope everyone like and enjoy this blog and get valuable information which you can share with your friends. You can ask me anything on my Twitter, Facebook or Google+ Account