
Can AMP Optimize Your blog and Make Mobile Pages Load Instantly
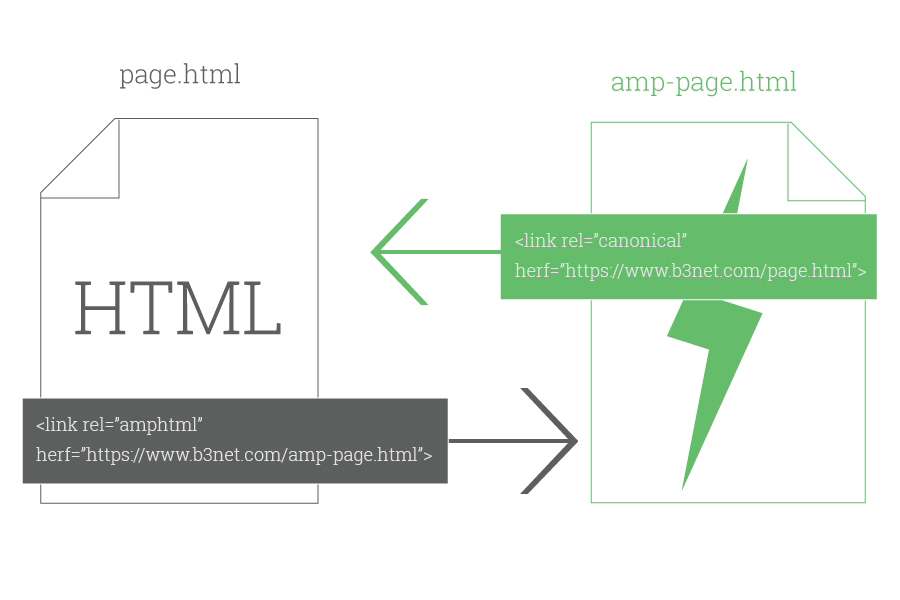
Accelerated Mobile Pages (AMP) an open source mobile pages format, is a project from Google and Twitter which makes mobile pages really fast and loads the static contents instantly on mobile devices. AMP pages are similar to HTML pages except some rules and regulations. AMP pages can load on an average of 4 times faster than the non-AMP pages.
Normally accelerated mobile landing Page is a trimmed and restricted version, as it uses limited tags. With those restricted tags, it removes lot of styling from the web page, removes unnecessary widgets thereby it drastically limits the use of JavaScript which can cripple the analytics of the webpage. In short, it delivers a mobile- friendly published content as soon as possible.
What makes AMP fast ?
- Reduced tags
- Streamlined CSS
- Standardized JavaScript and other components
- Designed to be heavily cached
Optimizing the blog with AMP : (Step by Step Procedure)
Creating a AMP page from scratch is not a big deal, unless you are an experienced web developer. But basic understanding of various components of a AMP page and the step by step procedure could benefit in shaping a perfect AMP web page.
Step 1: Requirement of staging website:
A perfect staging web page is necessary to test the AMP set up before deploying it on any live web page. Because when AMP is enabled on the website, it may not add any styling to the current AMP pages. Changing the styling of the AMP page is needed in order to give the perfect look and feel of the web page before making the web page live.
And also remember to remove the warnings or errors that are found in Google search console or Google Developers console and make sure the AMP pages are valid.
Step 2: Install & Activate AMP WordPress plugin:
Install and activate the AMP WordPress Plugin by clicking the Download ZIP button. Activate the downloaded plugin through the “Plugins” menu in WordPress.

When the plugin is activated, all the WordPress posts on your page will be dynamically generated as AMP versions. But the AMP pages are not set as default. And can be shown as a valid AMP page, once they are indexed. Accessing an AMP version of web page can be done by just appending “/amp/” at the end of the blog post URL. In other case it can be appended as “?amp=1”
For Example:
https://www.example.com/yyyyy/
then the AMP version of the web page will be:
https://www.example.com/yyyyy/amp/
This current version of AMP Plugin works on WordPress posts but not on web pages.
Step 3: Validate & Tweak:
The AMP page of the blog / web page must follow the AMP HTML Specification to become a valid AMP page. Follow the simple steps mentioned below to validate an AMP page.
- Load the AMP web page which needs to be validated in the Chrome browser.
- Right click the page and select “Inspect” from the menu that appears. By clicking it, open the Chrome developer console window.
- Click on the “console” tab.
- At the end of the AMP page URL, add the following “#development=1”.
- Then reload the web page and check for validation messages in the console window.
If the loaded page is a valid AMP, then it will result “AMP validation successful” message in the console window. Else it will send a “AMP validation had errors” message. To check and diagnose validation errors, click the URL which contains errors in the console window. It will then list the related information in order to correct the validate errors.
Step 4: Schema Markup for Validation:
A valid schema markup is important for the AMP pages. The web pages are tested for valid markup by using Google’s Structured Data Testing Tool. If there are issues with WordPress, few modifications can be made to the plugin.
To validate an AMP page through structured data testing tool, follow the steps below:
- Navigate to Google’s Structured Data Testing Tool page.
- Click “Fetch URL” link.
- Enter the URL of the AMP page in the provided text box and then select the “Fetch & Validate” button to get the Results.
- Then select the “AMP articles” from the drop down menu.
- By doing so, it results the status of the web page. If the status is “All good” specifies that the provided AMP page is valid. If not then “errors / warnings” are shown as a result.
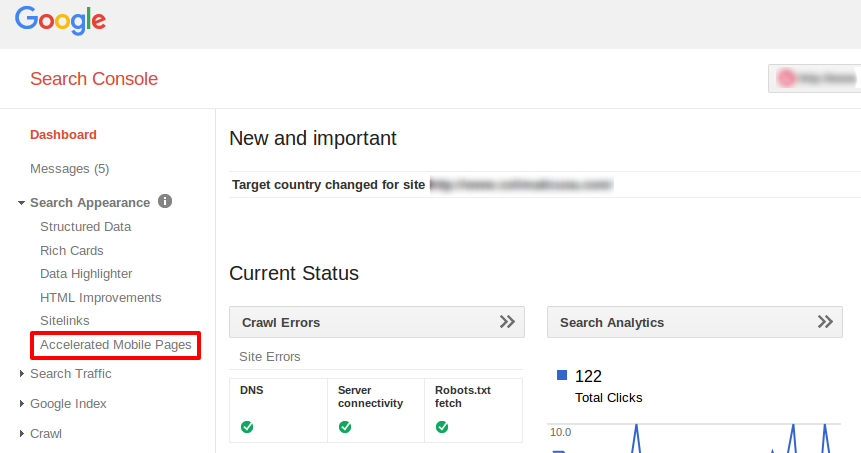
Already existing indexed AMP pages can also be validated through Google Search Console. This can be done by navigating Search Appearance > Accelerated Mobile Pages.
Step 5: Navigating through AMP menu:
Navigate the AMP menu, and click on the “Design” tab to add styles to the AMP pages by customizing the settings. The AMP icon must be added, including the default image to the blog post, else the AMP pages are not validated.
Step 6: Save the changes:
Clicking the “Save” button could keep the changes that are made.
AMP can provide better user experience faster than the current system, as it offers relatively simple way to improve the speed of the mobile web pages for the publishers. Though AMP is not full – featured for web pages which rely on custom JavaScript and web forms, it follows a standardized way of including analytics code, thereby limiting the use of JavaScript.
- Do’s and Don’ts of Mobile App Marketing via Social Media - March 30, 2019
- 8 Digital Marketing Trends in 2019 You Should Follow - February 6, 2019
- Voice Search Optimization: Tips for Your Creative Content Marketing Plan - July 30, 2018
Related Posts


About The Author
Sarah Clark
Sarah Clark, working in B3NET Inc. & Mobixed as Content Developer. B3NET is leading web design & web development company from Orange County, California, Search Optimal is the Internet Marketing division of it. Sarah is working in web, mobile & Internet marketing domain with her 8 years of experience.